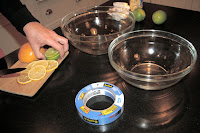
I am back with another tutorial. This one is great for parties. And can be done all year round.
Thing you will need:
- Two nesting bowls {we used glass bowls for the purpose of taking photos, any type can be used}
- Bottled water {NOT tap water}
- Something to freeze in the bowl, i.e. fruit, flowers, cranberries, seashells the possibilities are endless. {you just want to make sure the objects do not float, and they go with what you will be using the bowl for}
- Tape {we used painters tape since it was what we had on hand but masking tape is a better option}
- Space in your freezer for the bowls.
- Enough time for the bowl to set. {overnight is the best}

1. When using fruit make sure to slice it thin.

2. If you are using larger objects like seashells place some at the bottom of the larger bowl. Add some water to the larger bowl.

3. Place the smaller bowl inside and add more water. Make sure to leave some space for when adding your objects.


6. Place it in the freezer.

7. After it is completing frozen, taken the bowl out and let sit for a few minutes. To pop the smaller bowl out add a little water to the bowl.

11. Make sure to place it on a tray with a cloth napkin or something to soak up the water as it melts.


3 comments:
Great tutorial! I've always wanted to make one of those, but never have! now I'm inspired! thanks!
Suzanne
you make it look so easy!
I LOVE THIS IDEA!!
Post a Comment